Wednesday, October 20, 2010

At Last - An Update on the Loghouse!

Hello Everyone!
Happy Holidays and Happy New Year


Since my last post, I'm thinking you're thinking I'm either under the jailhouse for premeditated murder by wireless phone or Tim has locked me in a closet somewhere between here and San Antonio, Texas and thrown away the key. Tim is alive and well and so am I. Since the last post, we have new house phones and I've not thrown anything in some time, not even a little hissy fit. Tim did throw a pretty sweet 50th birthday party for me on October 19th. Oh, the fun is just beginning.


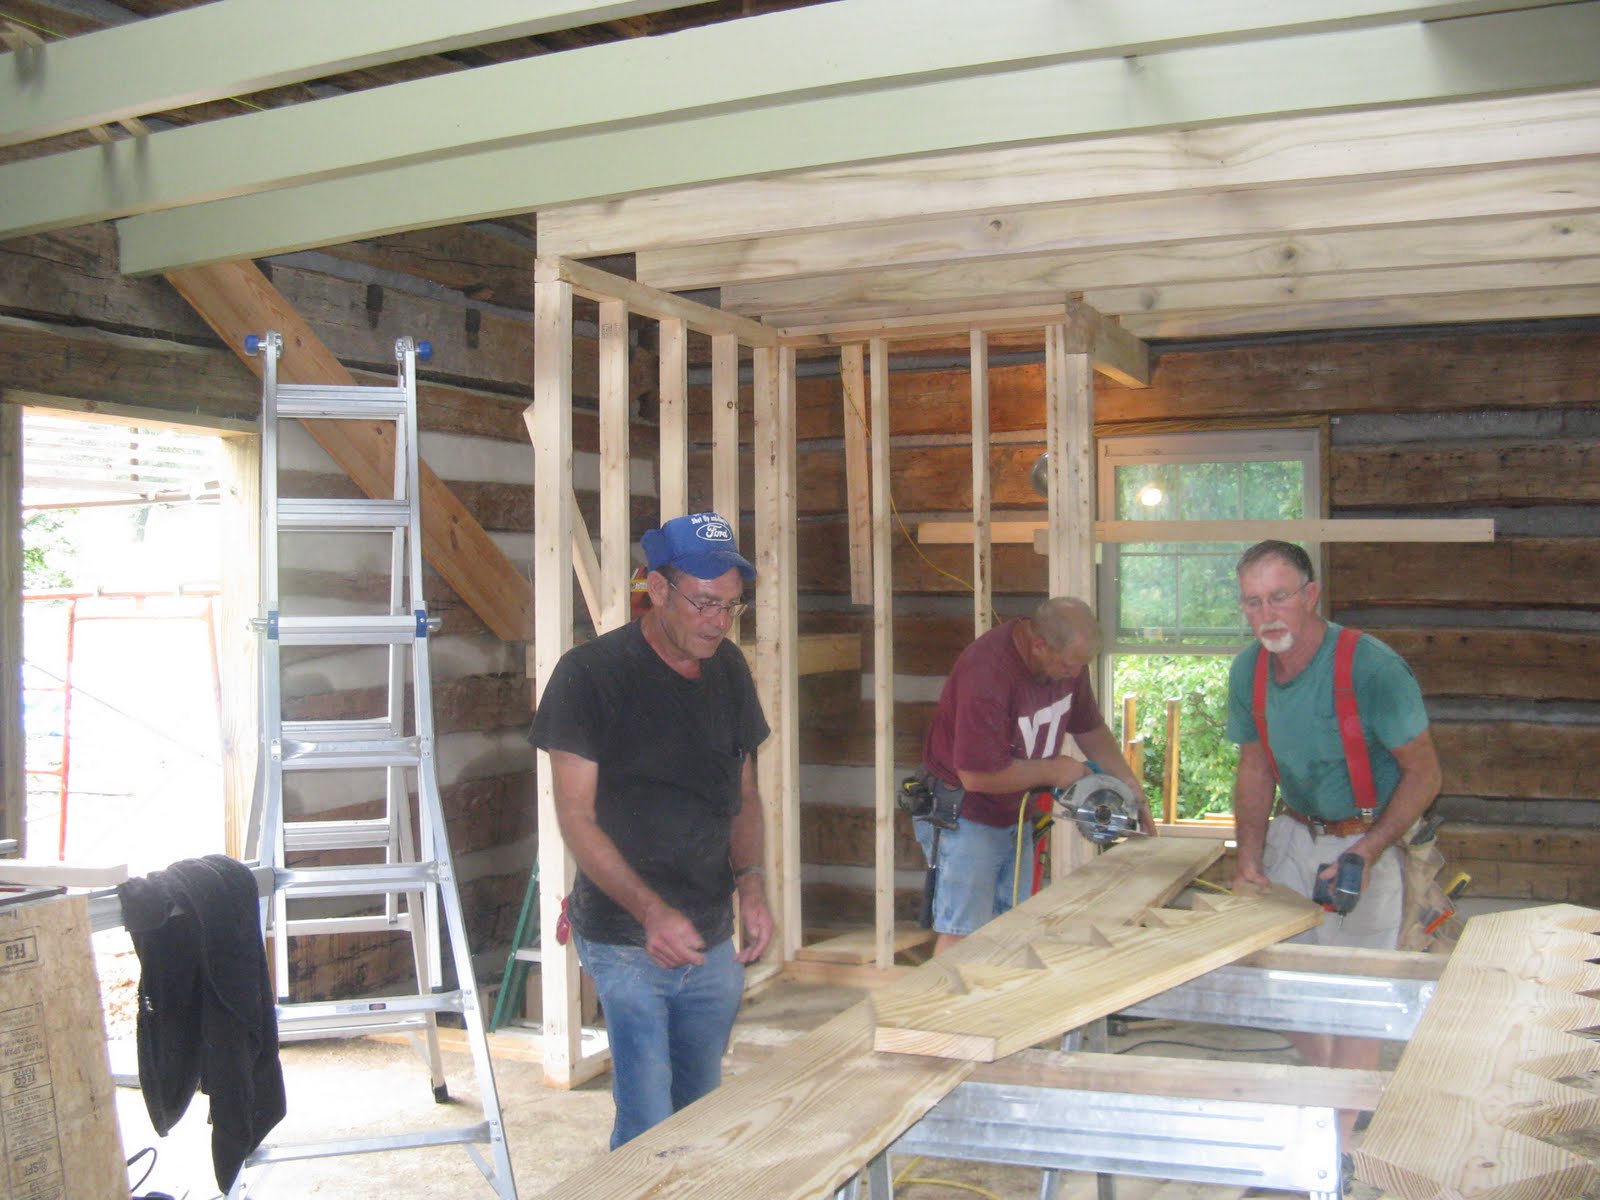
Okay, I know it's been awhile since the last update, and I do apologize. Many folks have asked what's going on or if we've just stopped all together. We've not stopped other than a break to visit San Antonio and in between waiting for materials. As for me personally, I'm either an over-achiever or just crazy. I started a program with the Medical College of Georgia and took on 6 classes this past semester. Building a house and 6 classes are very doable, not a problem, but then I threw in going back to work full time and traveling. To say I'm off the streets and out of trouble is an understatement to say the least. But things are moving along nicely - most of the time. Doug, Lee and Jason have done a beautiful job bringing these houses together. Together and apart, they have remarkable skill and vision - we appreciate having them here working with us.


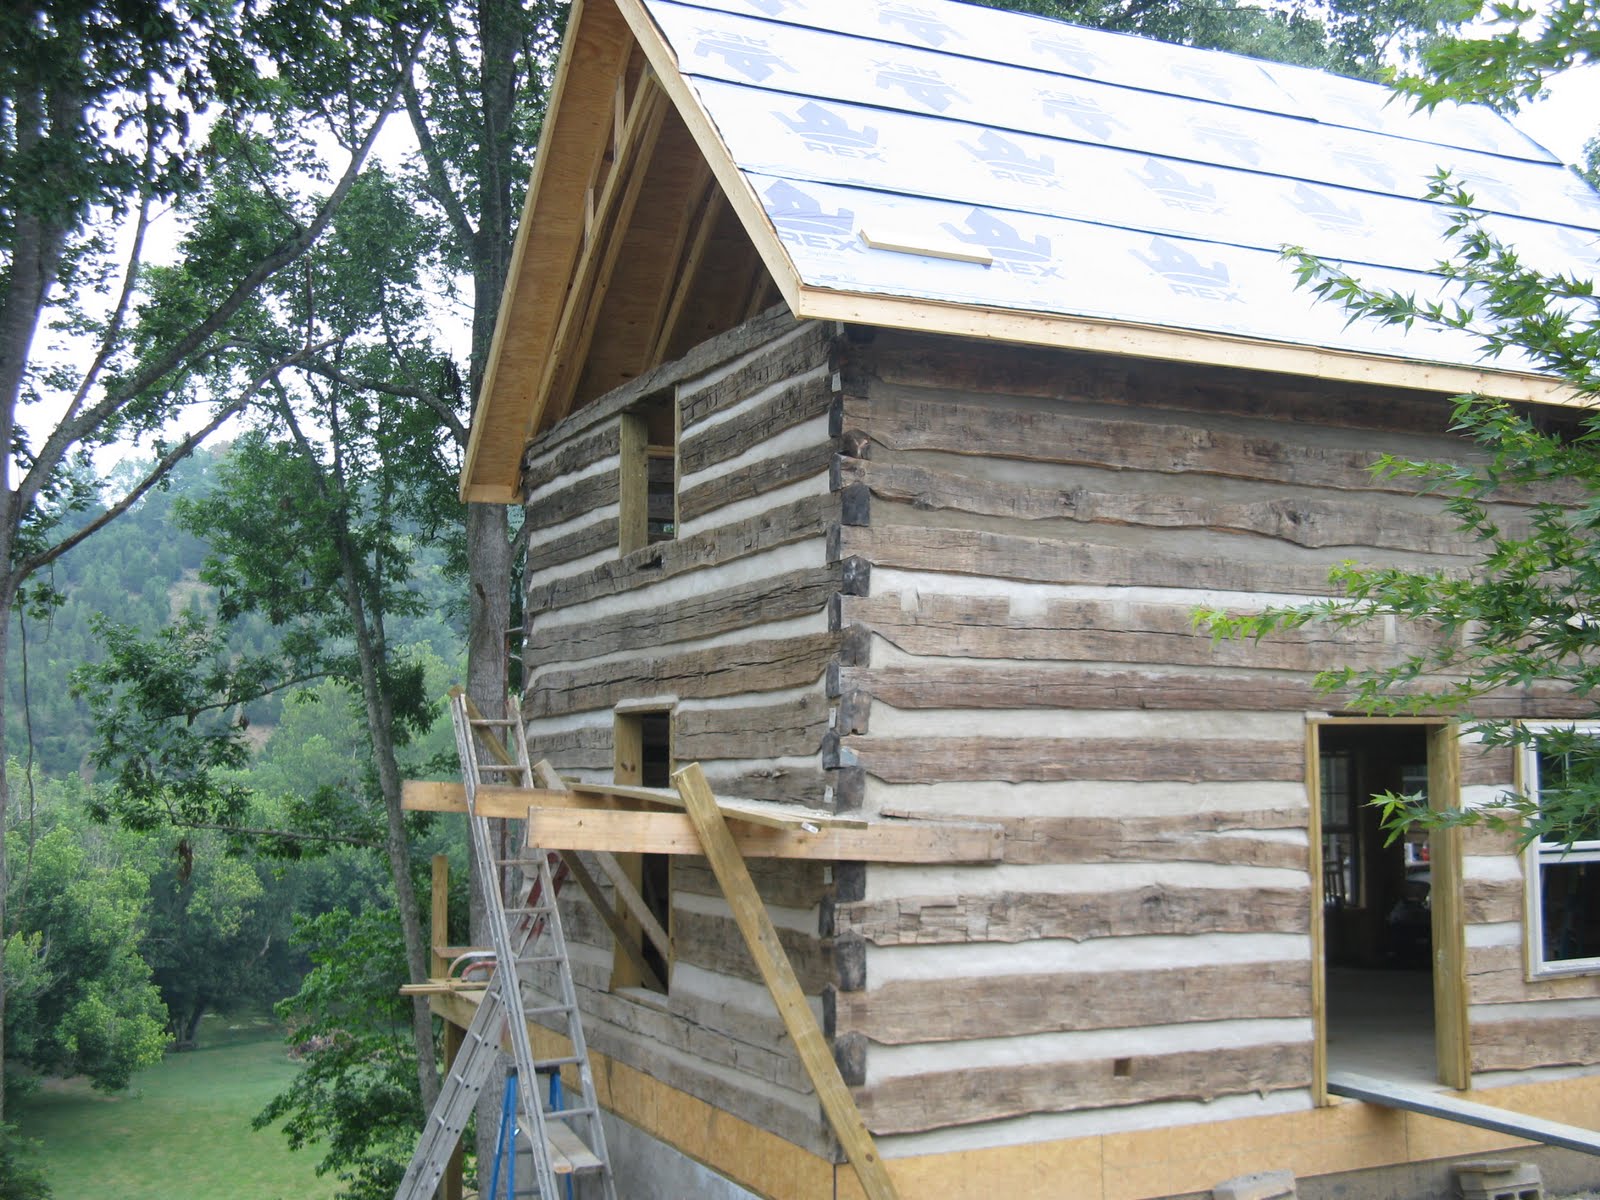
We've had a few issues - overall very minor, but just when you are moving forward, you have to stop and back up. The first big issue has been the electrical wiring through the chinking. When we built the original house, the wiring went through the logs, we drilled through each log so the wiring would be vertical. This time we took a horizontal approach. The design has worked out well because it's easier to run the wiring through the chink joints rather than drilling down through all those logs. The building inspector had us take a lot of electrical out and run it through conduit. He wouldn't pass the electrical inspection on the log part because the concrete "might" corrode the casing on the electrical wiring. Well, in my mind, the wiring is running through 2 sides of R19 insulation and doesn't touch the concrete/mortar. The wiring hasn't corroded, yet anyway, in our house and it's not in conduit. But, in any event, we have the electrical in conduit. The other issue was the roof. I think I mentioned before about Elvis, the "wanna-be" roofer. He's a great project manager, but he "ain't" no roofer and he "ain't no friend of ours. The flashing they put up on the foyer roof was beyond pathetic, it was so bad, I won't even show you the pictures. Let's just say Mike, the owner of the roofing company replaced a lot of the tin and made the flashing work beautifully. It took a while, but he came through. They are finishing up the porch tin this week and the guttering needs to be the next step. The chinking is done, both inside and out. For the most part, the chinking looks great, but they just don't make mortar and concrete like they use to. There are some cracks, although they're surface cracks, some of the chink joints were bad enough to be replaced. Jason and Tony believe the extreme heat this summer dried out the mortar too quickly. It's amazing how warm the house is with just a few radiant heaters. Even in single digits, I was able to paint the wainscoting and window trim with just a light sweatshirt. The pictures here are the main floor, the main floor washroom and the ceiling, which is the floor upstairs.


We've not been upstairs in almost 4 years since we took the log house down. It's like a tree house up there. This room will be one of two guest rooms. The windows are almost on the floor, which I think is perfectly charming. You'll be able to lie in bed and look straight out across the porch roof at the river, when the windows are open you can hear the river shoals. The huge trapezoid windows are perfect for the room. I think I told you I found those in a horse barn for $70.00 each. I guess there's always some horse manure you have to tolerate to get a great deal. The sheet rock is going in this week. Before it goes up, we've but in the faux center beam, a 12" x 3" hand hewn board that looks like a support beam running through the center of the ceiling. The sheetrock will butt up against the beam and I plan to use 4 round beams on the ceiling to tie the look of support together. Next, I'll paint the trim around the windows, (it's hand hewn lumber also) to bring out the texture in the wood. It will look very rustic and worn. The look I'm going for is a rustic European look, like you would see in southern France, rustic beams, rustic floor and lots of light. We have so many requests for spending the first night up there that it looks like about 30 folks will all be piled up together. You might think about bringing your own pillow and blanket (BYOP&B).


The porches are perfect. Our good friend Bo said the other night the back porch will be a great to play music and listen to the river shoals. Okay, Matt, Todd, Daryl and Bo, you're up, as soon as the weather breaks! The back porch gets 5 beams and 2 fans. The beams are actually the original roof trusses from the McDavid log house. They're flat on one side where the roof rested at one time. Some still have the bark on them. The front porch post were "gifted" to us by Jim and Maureen Tilley some 10+ years ago. I had plans of putting them on a greenhouse front porch at one time but the greenhouse never made it to drawing table. Doug added about a foot and half to them to make them fit the height we needed for the roof pitch. The railing will match the original porch railings. The front ceiling is an old fashion blue, like the color of my grandmother's porch ceiling. Speaking of blue porch ceiling, we salvaged the original front porch of the McConnell house and it's been in the barn for twenty some years. I'm using it in the main floor washroom ceiling. It's unexpected and fun. I just hope we have enough of the original tongue and groove.

The downstairs is coming together nicely. Doug and Lee put in the wainscoting and I made my paint color and finish. I had no idea plum with a brown over glaze with grey squirrel trim would look so good with orange spice and the yellows. I love it!


The floors are down in the main foyer and they look beautiful. I'm deciding what treatment I'm doing for them. I've painted the floors in the rest of the house to look like old heart pine that's worn and distressed. I'm planning to use soft mineral grays and creams in the foyer and somehow think a scrubbed pine floor would look great. You'll have to close your eyes and imagine the look of an old beach house floor, the wood is distressed with years of sand ground into the grain and worn away the stain. We have a new little gadget, a flip camera that's a great little video/camcorder - I'll try to do a little demonstration of how to do some of the faux finishes I'm doing here.

I've purchased beautiful Virginia field stone that's sort of rectangular in shape for the front foyer exterior. It's natural stone from High Knob, Virginia. When we get a break in the weather, David will start laying the stone. If you remember, I told you we were at a sweet little trattoria in Greve, in Florentine Chianti several years ago and we (sometimes we equates to I) just fell in love with the old stonework style. I also took some great pictures of old stone work from the old missions in and around San Antonio,Texas. I'm having one of the extra logs split and sized to fit over top and underneath the window to look like a support beams. Ideally, I'd like it to look something like this.


The back side of the foyer will be covered with poplar bark siding from Uncle Bud Phillips. Here's a few pictures of the popular siding taken in Blowing Rock, North Carolina this past summer.


I've promised you a story about Uncle Bud, he is one of the most delightful characters I've ever met. This summer I was on a mission to find the source for poplar bark siding and Larry Shoun told me Bud Phillips was the man. He said you'll never forget Bud, he's a real character, and is he ever. The first time we met Uncle Bud was in his office in Spruce Pine, NC. I started to sit down, and he said, "before you sit down you have to rub the rock". I'm sure he read my mind and quickly pointed behind me, and told me rub the rock behind me. There was a slab of white granite, with black veining and studded with the most beautiful emeralds I've ever seen. He said it would bring me luck and great fortune. I rubbed the rock and kept my hand on it a while just in case he knew what he was talking about. Bud is miner of gems and other things, and he knows the geology of just about every segment of this country. As he talked about his years mining minerals in North Carolina, he pulled a rock out of the safe. No ordinary rock mind you (and there's nothing ordinary about Uncle Bud either), he pulled out an emerald about the diameter of a quarter and about 4 inches long. Needless to say, he had my attention as he told the story about mining that emerald not far from where we were. As he talked, he'd lean back in his old worn out office chair, close his eyes and talk about when he was a student at Lees-McCray in Banner Elk, he's experiences mining all over the country, chasing women and drinking. He's actually pretty brilliant and is a great storyteller. He has his toys littered about in his lumber yard. One is a railroad crane he plays with on Sundays. He and the fellow that works for him tie wildflowers on the tail hitch of his old truck and they run around the country throwing out Paulownia tree seeds. I personally think they ride around smoking this stuff. I'm headed back to Spruce Pine to pick up the poplar bark siding as soon as the weather breaks and hear more stories that only Uncle Bud can tell.


Okay, I've got a very busy couple of weeks before class starts again. I want to get as much painting done as possible. When the sheetrock is done, I'll spend a lot of late weekend nights and wee hours of the morning texturizing and painting. I'm also planning to complete move furniture around. When I catch a break in the weather, I'll touch up the porch ceilings and start laying out landscaping plans.


I hope it's not so long before catching you up again. Hope to see you soon, come around when you can .


Love you much

NoraBelle

Thursday, August 5, 2010

A Hot Tin Roof

Hi Everyone,

Good Grief Louise has it been hot. Hot in more ways than one - around here anyway. Soaring heat, flaring tempers, flying phones and the few children that have been here lately are scarred for life I'm sure.

It's a good thing Tim and I can laugh about fighting about budgets, progress, what can or can not be done. Gotta have a sense of humor around here, in a big way. I am known, at home anyway, for being marginally pissy about a certain things. I am especially sensitive to individuals that I must drag into a conversation about constructing this or that. It really makes my toes curl a bit when they don't have much to say about the particular topic. I tend to sprout fangs when they suddenly interject some reason why the plan can not be carried out while we are in the midst of carrying out the very plan they didn't want to talk about in the first place. Tim has finally learned it's not a good idea to wake me up to tell me my plan won't work, especially if he's not participated in the discussion. I turn into a foaming, raging, curly haired, crazy woman. He now understands his chances of survival are much higher around lunchtime. Recently I've had the exhilarating experience of throwing the phone, with Tim on the other end, watching it hit the door and totally mesmerized as the phone splinters into a million pieces. I don't think I've ever been that satisfied or felt that empowered or liberated. You can only understand some of this if you're the least bit passionate about what you do and love what you're doing. I do, and that's why I've invested in cheap phones.


Okay, enough of that, we've made great progress, even with all the heat. I think to date, we've had 48 days with 90 degrees or better in a row. The front of the house faces the southwest and about 5pm, it's the hottest place on the planet. Miserable. The gable ends are complete with windows, gable vents and soffiting. We used hemlock for the board and batten and the vents came from Kimball Designs in AK, they're made of western cedar. We'd planned on using western cedar for the siding like we did on the main house but the price is 3x's that of pine. I understand carpenter bees don't care much for hemlock. Too bad it doesn't have the type of poison the hemlock plant has. I hate carpenter bees.


The tin is also on, as you can see. The color is a soft charcoal and it blends so well with the logs. We used a company out of Johnson City, Tn., Weather Tamers. For the most part, they did a good job. I had mentioned earlier about cutting into the logs and chinking to fit in the flashing. This worked out perfectly thanks to Jason, Tony and Mark. I can't say the same for the guys from Weather Tamers. Mind you, they are accustomed to cookie cutter roofs and nothing as complex as this. The guy working for Weather Tamers name is Elvis. We'll,, let's just say, "Elvis has left the building". I won't insult Elvis by showing you pictures of his work, but I am assured by the owner of the company it will be fixed - and not by Elvis. More on that later as we move along.


Doug and Lee have trimmed the outside windows with the wood original to the existing McConnell house. All the wood for clapboard, trim, flooring, etc, from the McConnell house is yellow poplar. How lucky are we to have such precious wood as this. It doesn't rot, those da-gummed carpenter bees don't like it. Tim is begging me not to paint it. It will be painted at some point, but for now, I'm leaving it alone. All the outside windows have been trimmed out and we're waiting for Jason to notch the door jambs for the electrical wires before we put the door trim on.


What a crew! Doug, Lee and Tommy. Doug is the master carpenter. He says of himself, he's slow and sure and is pleased with his work when he's done. He knows it's done right. Here you can see the original beams painted their new color, Wild West Green from the La Fonda Collection (historic preservation colors) and the raw poplar beams yet to be painted. Doug cut down a poplar a few years ago to use for a personal project but decided they would have a better use here as the balance of the floor joist beams. You can also see the walls of the corner fireplace and the stairwell walls. The landing is complete. When the stairs are complete, I'll let you know. I can't wait.

In the next few weeks, I'm going over to Spruce Pine, NC to pick up the poplar bark siding for the back of the breezeway. I'm getting this from Uncle Bud. Uncle Bud is a delightful character and I want to give him is due and dedicate the next entry just to Uncle Bud. You'll enjoy the story, trust me.

Okay, that's all for now. I have a lot of work to catch up on. Thanks for asking about the project. Sorry I've been so long in getting this entry in. It's been a little crazy,,,and I have too.

Talk to you soon
Take Care
Nora Belle


Thursday, July 15, 2010

Inside Chinking and Framing in the Gable


This is been a crazy week.
The lesson for this week: Complex problems have simple, easy to understand wrong answers.
That says it all....and saves me from going into a long dissertation, so I'll just leave it at that!

My central responsibility in this project is coordinating materials, directing the work to be done and the time lines to get a job started and finished and communicating between all the groups we have working here. I'm either in the middle of construction or on the phone, texting or calling someone to tell them what we need, when or telling them when they need to be here to complete a task. I try to plan out the next tasks well enough in advance so we have delivery of materials when we need it or have plans drawn out so they know what their objective is. It's not an easy job, mostly because I'm not a builder, I just know what I want. The stairs are a good case in point. They have to work where they are, no compromise or change of plans. Doug and Lee just have to make it work. I have full confidence they will.

This week we started out a little sketchy. At times, I wasn't sure if we were going to get anything accomplished. The project almost went into a downward spiral, then....all the sudden, things are popping all over the place.
Doug and Lee are framing out the gable end for the trapezoid windows and then will get ready to move to the other gable to close it in. They have to get it closed in with the fascia boards, bird boxes and board and batten before the week of July 24. Doug will be on vacation that week and the roofers will be here to put the tin on. We can't be on the roof with the tin, so it has to get done. Jason has to saw into the logs and chinking to fit the flashing in next week. This is on the lower roof line, the connector to both cabins.

Tony, John and Mark are putting in the insulation, wire mesh and chinking mortar in the corner where the stairs go . This has to be done before the stairs going up can be built. The chinking mortar for inside the house doesn't have to be as "wet" as outside. It's drier, but it's not so dry it won't stick to the wire mesh. So, I guess what I told you last week is not necessarily true. But it seems to work just fine. Many of you have asked how the chinking is done on the inside. You can see from the pictures how they put the insulation in and wire mesh over it. The walls they are doing now do not have electrical in them. I'll show you that process when we get there.

Monday, 1200 board feet of planed hemlock will arrive from Shoun Lumber, along with 1200 board feet of 2"x8"x 14' tongue and groove white pine flooring for upstairs. I ordered 2 western cedar gable vents online this week, they should be here by Saturday. The hemlock is for the gable ends, fascia boards, stair treads and soffit material. There is also a 20' x 12" hand hewn board coming for the fascia board to go between the log house and the cinder block for downstairs.
Next week will be a very busy week indeed!
Come around when you can!
Take Care
NoraBelle


Wednesday, July 14, 2010

Stair Stall


The stairway to heaven has turned into the highway to hell.

No one anticipated building the stairwell to be this difficult. We've been working on the stairs for five days and only have the steps going downstairs and a landing in. The root of the problem is the window is in the way of the steps going upstairs. The reason the window is in the way, in my estimation, it was cut out too long. The original window was not as long as it is now. If we'd kept the window the same size, or within a few inches, there would be no problem. The walls of the main cabin floor are about 9' tall and the window is 37" x 68". The window comes up 17" from the floor and the stairwell openings going upstairs are about 7' 8" and the opening going down about 8', the best I can tell. (I'm sure it obvious I'm not building the stairs). The difficulty has been keeping the bottom stairs out of the window and meeting the Virginia code of a 7-8" riser height and 9 1/4" tread and maintaining a landing clearance for head room at 80 inches. Head room going up is not a problem, but going down is. To add to the woes of meeting Virginia building code, I'll have to put bars on the long window to pass inspection.

Doug, Lee and Jason worked together this morning to figure out how to make the stairs fit and between the three of them, they came up with a solution. I don't think the guys are too happy with me, carpenters are a funny lot. They don't like it much when someone else is playing in their sandbox. But, the point is, we had a window that was too big and we were struggling to make the stairs fit. The end result, three heads are better than one. I feel much better about moving forward. Yesterday I was having serious doubts about getting the stairs in at all.
Jason and his crew are coming in tomorrow to chink the inside part of the cabin where the staircase goes. Once this is done and cured, Doug and Lee and can finish the stairs going up. I will be a happy gal with these dad-gum (I'm watching my language) stairs are complete! I know Doug, Lee and Jason will be too. We are finishing out the gable ends the rest of the week. The big hurdle now is getting scaffolding level on the side of the hill. That will be another story

More on the stairs as we make progress.


Talk to you soon

Take Care

Nora Belle

Friday, July 9, 2010

Chinkin' Chick


Chink -(chngk) intransitive verb. 1. To make narrow openings in.
2. To fill narrow openings in. 3. Slang. coin or ready cash.
Ready Cash? Readily leaving our pockets is more like it! In the grand scheme of things, I sometimes think "It's only money" and then I think about the alternative. You've heard "You can't take it with you", haven't you. Well........what if you can? Wouldn't you feel kinda silly when you arrive at the Pearly Gates and St. Peter asks.."Where's your stuff"? I don't know, but it gives me something else to think about while the chink, chink sound is pouring out of our pockets.

This past week was chinking week here at the loghouse project. Chinking is my favorite part of this project. It not only shows the character of the house, but it defines its charm. When we took the house apart several years ago, it had no chinking at all, just slats of wood jammed into the chink joints. The logs were covered in red oak planking, about 1 1/2" think and about 8" wide, on top of the red oak was years and years of wallpaper. When we took down the old McConnell house, the chink joints were filled with mud and horsehair with chits of wood.

The chinking we put in this week is made of sand, brixment N and S type mortar. I worked with Andrew to understand how this stuff is mixed. It's very important to mix all the dry ingredients together, much like mixing ingredients for a cake. Mixing is not just mixing, it's chopped using a hoe. This kind like hoeing out a corn row. Once it's chopped, then mixed again, just add water. Water is the real trick, you can't add too much or it's soupy, too little and it crumbles and won't stick to the wire mesh. When you clump it in your hand, it doesn't all stick together, but it doesn't exactly fall apart either. It's one of those tacit things you learn by doing over and over again to get it right. That is if you don't have a Tony Russell around to show you how it's done.

The mortar is put in with a small trowel in the chinking joints. Tony and Mark are experts at this and it's amazing to watch them work. They each have different techniques putting the mortar in but with the same result. Once the mortar is dried for a few minutes, they use wet gloves to smooth out the mortar and give it the shape it has. The mortar has to be sloped downward (concave) to allow rain to run off. It was so hot this week, it didn't take long for the mortar to dry out quickly.
So, now that the chinking is in on the outside, we'll starting cleaning out the joints on the inside and put GreatStuff along the top, bottom and sides of each joint to stop any airflow. I don't know what we did before Great Stuff came along. The Great Stuff we used 20 years ago isn't the same stuff we have today. 20 years ago it was a formaldehyde based. What we use today is silicone and doesn't deteriorate as quickly. Case in point,this summer we power washed the logs from outside. It took 2 days for the logs to dry out in the inside. At least the logs are clean inside and out.
Doug and Lee are back this week working on the stairs and closing in the gable ends, putting in the windows and board and batten. More on this progress later.

Have a great week!
Come around when you can.

Talk to you soon

NoraBelle


Thursday, July 1, 2010

The Elephant and A Different Breed of Cat


Hello Friends,
Thanks again for coming by the house or asking how things are moving along. I laugh each time someone asks me if the project is completed. Only in my dreams. But keep asking, I love it that you're interested.

The Elephant and Building Codes: There's a very funny email circulating, "Why Teacher's Drink". If you haven't seen it, you should. It's hysterical. In one of the scenarios, the student is trying to solve a very complex problem and is having great difficulty doing so. The answer requires an explanation for Yes or No. The student can't solve the problem, so he draws an elephant in the middle of the problem and says he can't solve the problem because there is an elephant in the way. Well, I don't have an elephant in the way....I have a whole herd of them! The issues we face everyday with the building of this house are a little like trying to move a herd of elephants. You have to be very, very careful. The decision making process of where to put stairs, for example is simple, but how to construct the stairs is another matter all together. The stairs are going in the log house, and this should be easy, but the stairs have to start in the middle of the window to make the landing and turn to reach the first 18' floor joist, which is over the front door. Are you with me? The devil really is in the details. The details of building codes, that is. Virginia says I can't have stairs in the window unless the window has tempered glass, or I have bars across the inside window. I don't know about you, but I prefer to be IN a bar, not behind them. Then there's the quandary of the rise and run and the variations on step height. Without going through the brutal details, we've spent 2 days trying to get the right specifications and we finally have them. That's one elephant out of the way. The other elephant is plumbing. You can't just run PVC up through a log! And how do you get upstairs plumbing down, up and over. Another day and half was spent on how to build chases and where they should be. We've gone through just about every scenario you can think of, but I think we're getting closer. The electrical is about to be notched in. Jason will use a chainsaw to make channels down the door facings for the light switches and drill through the logs for the outlets. He assures me this will work beautifully. I"m just waiting to see what little devil rears it's head when we start this. There are a few more elephants out there, we'll just have to move them one at a time.
We are putting in the wire mesh between the logs and getting ready for chinking on the outside. The diamond wire mesh has to be cut to fit in between the logs, nailed in with roofing nails and it's sloped to provide water run off. The slope starts fairly deep at the top of the log and slopes down to the outside of the next log. I've included a picture so you can see what that looks like. Jason thinks he can start chinking Friday or Monday. He will chink the side next to the existing house first. Once that side cures out, he'll use a chainsaw and cut into the logs and the chinking to fit the flashing in for the tin roof. I expect chinking will take the better part of next week. He'll use about 6 tons of sand and S and Brixsment N cement to make the mortar. The outside mortar will be a greyish color and the inside mortar will be a buff color.

A Different Breed of Cat: A special note to my dear friend Dr. Patricia Brown, my (forever) professor of English, American and World Lit and someone I adore and admire. She sent me this email the other day: OTHER FOLKS JUST DREAM NORA. YOU CALL UP A CONSTRUCTION CREW AND WHIP THEM INTO SHAPE. YOU CERTAINLY ARE ANOTHER BREED OF CAT!!!
Pat, You and a few other different breed of cats are responsible for this! You've taught me for years there's nothing I can't accomplish. And you, like the others, and you know who you are, set me free to dream. The power of education is liberating and empowering. I've learned through you and others to look at problems and situations from the outside in - upside down and sideways. Interpretation is the engine for imagination. Thanks for giving me a jump start...not that I need too much juice to begin with. Love ya!

Talk to you soon
Nora Belle

Tuesday, June 22, 2010

What am I doing?


How many times do you think I ask myself that during this addition project? The answer is all the time. I have a different way of looking at this project in my mind. Sometimes its in 3-D, sometimes I can see through walls that don't exist yet and most of the time I can visualize the color and texture of the walls, ceiling and floors. Most of the time it works, but sometimes it just doesn't pan out the way I think it should. Today has been one those days. I try to use "form follows function", but sometimes the function gets in the way. I've redesigned the washroom/bathroom 3 times today. I really thought I would have enough room for a utility closet with stackable washer/dryer. Well, the form is just not following the function today. So, I'm compromising on having a beautiful washroom with very unexpected features...without the W/D. And that's okay. I'd much rather have a bubble bath than fold clothes anyway.

The roof guys are here putting down the underlayment for the tin roof. Wow, that's pretty tough stuff they're putting down. It's a synthetic felt, much like house wrap material. They dropped off the flashing, but they need to bring the break to fold in another turn to fit back in the logs. Jason will have to notch out the logs on both sides and slide the flashing in the notch to prevent water from seeping under the roof material. I'm anxious to see how that works. He will cut through the chinking and logs on the existing house and cut through on the addition side.

Tomorrow, Doug and Lee will frame in for the trapezoid windows in the gables of the log house. The windows are HUGE. 61 1/2" x 4'. I can't wait to see them framed in. Last night I was looking at the moon glow from inside the log house, this room will be beautiful both night and day.

That's all for now. I'm getting behind on so many things, weeding, assignments and tests, so I need to concentrate on these things this evening.

Hope to see you soon
Take Care

Nora Belle

Sunday, June 20, 2010

You Got The Right String Baby But The Wrong Yo-Yo


June 18, 2010
It's been that kinda week friends!

This week I've been more than a little worried. At the end of the week, looking back at the some of the problems we've had, they seem very small compared to the progress we've made in just a week. There were times I expected the whole project to come to a screeching halt. At the end of the week, the roof trusses on the log house were on, the exterior stud walls are up, ready for the roof trusses for the breezeway. Jason has notched the logs for the electrical and window and door jambs are ready. The big challenge here has been finding the old forged nails in the logs. Doug and I had a long discussion about making nails. Imagine how long it took to make enough nails to build a house in 1820. They had to be forged,,,think about that the next time you're watching a blacksmith work.
Jason uses a chain saw to square up the openings and has had to resharpen his chain saw several times. A metal detector has really helped (Thanks Ricky). The wiring for the light switches will run through a channel down the door jambs and the electrical wiring for receptacles will run down through the logs, some will run through a channel under floor (which is the ceiling downstairs, 2" tounge and groove) There will be a fake beam running between each floor joist to carry wiring. Next time your here, notice the beam in the dining room, where the lights hang from. It's the same concept.

I learned something new this week about floor joists. Doug is a master builder and he knows how these old codgers built stick and log structures. I was worried about the floor trusses that came from the old McConnell house. (The existing 1896 house where the great room is today). All the trusses had a bow in them and I thought they'd bowed due to the being stored for 20+ years in a barn. The bow in the joist is intentional and is critical to the floor joists - the bow is what gives the joist its strength. Doug calls it a camber or an arch. The span of the joists is 18' across the log house. Think about how strong the arch is in building (just look at the Forum in Rome, or the old bridges in Spain). I'm still not convinced the floor will be level, but at least I know, "it ain't goin' nowhere". Doug says the weight of the floor should make the floor mostly level. If its not, it's just another layer of character.

I'm sure you're wondering what goes in between the two log houses, what it will look like, etc. I'm attaching this link of one of my favorite places (I have so many!), in the Florentine Chianti region, in the little town of Greve, Italy http://www.lacantinettadirignana.it/lacantinetta/index.php I plan on using a lot of the same elements such as the heavy beams and textured walls. The exterior will be stone with a similar look. I hedge between composite stone and real stone for several reasons. I'll make that decision when I need to.

Okay, that's all for this week. I promised the guys margaritas for happy hour. See you soon. Have a great weekend

NoraBelle

What a Week!


June 11, 2010
Thanks for hanging out with me this week.
Is it Happy Hour yet? While the guys are taking a break, I thought I'd send you an update.

Wow, what a week! We started tearing down on Tuesday and by Friday the log structure is up, pinned, joists in, (except for the stairwell joists). Amazing! We've had a couple of logs that have been "twisted" by the southwest exposure, but Jason and his amazing brothers made the logs go where they wanted them to go. We have 3 courses to go and should wrap up this evening around 5ish.

The next step is to power wash the logs and water seal the top and bottom of each log where the chinking goes. This weekend we will debark (although I would much rather embark,,,,sorry, couldn't resist) and seal. Then the floor joists will have to be sanded to get over a 120 years of dirt off and get them ready to paint. I'll give you a lesson in faux painting in a few weeks.

The roof trusses go on Monday. I mentioned earlier tying the two together will be the real trick. I'll show you what that means later too.

I truly appreciate all your interest and your responses to this "little" project. The blueprints are in my head, along with the final result. I know its difficult to see what the final product will be,,,,,,but stay with me baby,,,you'll get the picture.

Okay, I'm not going to write on the blog everyday from this point,,,only occasionally, The exciting part is over and it's time for real work to begin. The devil is in the details, so that's what they tell me,,,we'll see!

Drop by when you can, would love to see you, (and take a break)

First Floor is Complete and How Things Work


#1 Header Log
#2 Jason Renotching Logs
#3 A Very Tight Fit
#4 V Notch

June 10, 2010
Hello from the Holston,

Today was not as productive as I would have liked it to be, but we are at a point where we are sourcing out replacement logs and floor joists and that's not an easy task. The house had one rotten log, an 18' log and the top window header (22'.6") was missing, don't ask me how, I don't have a clue. Jason was able to pull a couple of logs out of an old barn near Shady Valley to use. The challenge now is to find 6 planed 12' 3x8 beams to use as the floor joists to tie in to the stairwell. We have a couple of options up our sleeves and a few good folks searching around. Hopefully we have a solution within the next week.

So, how does all the log house building work? Well, it's pretty logical really. I'm sure you remember playing Lincoln Logs as a child, it works pretty much the same way. This house is easy to fit together because the notches are "V" notches. The "V" notch is the oldest notch and was used on early log construction and didn't take a real craftsman to make. This notch dates the house from somewhere between 1800 and 1820ish. The house was built with 2 main floor seals, front and back and the logs were stacked from the left and right, corners on another all the way up. It still works the same way but we have removed the bottom seal logs because we have a subfloor for the logs to rest on. We've used heavy silicone and toe nailed the bottom logs to the subfloor. Each corner log is spiked together with a 12" x 1/2" nail, nailing one log to another for stability. The spikes aren't really necessary because the weight of the logs from top down would keep it from shifting...but I feel much better about them being there!

Look at the "V" notch picture, it's amazing how tight the joints are. You can also see how the logs are re-notched where they need to be. The header log you see will be cut for a large opening and the new header log will be on the same level as the floor joists logs. The crew had to use a sledge hammer to shift the house to make the joints fit,,,I was a little worried,,but it worked perfectly.

The electrical boxes will be notched into the logs (not through the chinking) with the wires running straight down to the floor trusses below then into the services box. (I don't know a thing about electricity except how to change a light bulb and turn on a switch,,,,I expect my knowledge base to expand quickly).

Tying the two structures together is going to be the trick. More on that later. Although I'm really excited about the log house construction, I'm really excited about the connector (breezeway). I've pulled out some old architectural materials from the barn to use in this space that will be fantastic.

Thanks for dropping by the project,,,it's always good to see you. Happy Hour is usually around 5 or 6 on Friday, drop by if you can.